
This article is a follow-up to a series of articles on Docker Docker, Containers Everywhere, Docker Automation Testing, and Docker Dispatcher SDK 🔧💪😎👍. Further building on the solid foundation, it’s time to add services that will allow you to provide value to each existing and new member.
AEM Project Services
In the last most recent article Docker Dispatcher SDK 🔧💪😎👍, we looked at a docker-compose file that allowed us to create a dispatcher container. This compose file was configured to work with the author and publish containers. This is a great start, and now we can add additional services that you have been missing all this time.
Leveling up your AEM SaaS project
TL;DR The best way to showcase this is to level up a freshly generated AEM SaaS project using Adobe’s AEM Project Archetype. You can find instructions on how to generate a project from scratch using Adobe’s AEM Project Archetype in the section Generate This Project.
If you already use the Adobe SaaS archetype, clone https://github.com/aem-design/aemdesign-project-services.git and can copy relevant files from the project to yours. Here is a list of files you want to copy and merge where into an existing project:
- .env (environment variables auto loaded by functions.ps1)
- .gitignore (git ignore file)
- deploy-apps.ps1 (only deplopy apps module)
- deploy.all.ps1 (deploy all packages as single package to author and publish)
- deploy.frontend.ps1 (only deploy apps and frontend module)
- deploy.ps1 (deploy script)
- dev-token.json (json file with your Adobe IMS token)
- docker-compose.yaml (docker compose file)
- functions.ps1 (helper functions)
- install_packages.ps1 (auto install packages to author and publish using package.ps1)
- local-token.txt (text file with admin:admin in base64)
- package-install.txt (list of packages to auto install)
- package.ps1 (papckage install script)
- push-develop.ps1 (pushes to adobe saas remote develop branch)
- README.md (additional information about the project)
- reset.ps1 (resets the project by deleting all volumes and containers)
- start.ps1 (starts the doscker stack)
Core Services
Before we get started, let’s take a look at the new docker-compose file you must have on your AEM SaaS project. If you are not doing this, then you are missing out on a lot of love!!! ❤️❤️❤️
So far, we have these core services:
author- author instance available on port 4502, https://author.localhost.publish- publish instance available on port 4503, https://publish.localhost.dispatcher- dispatcher instance available on port 8081, https://dispatcher.localhost.traefik- traefik dashboard, https://traefik.localhost/dashboard.createcert- creates the certificates for the Traefik instance; this provides all of the SSL certificates for the other containers.
This stack creates base author, publish, and dispatcher services that we can use to deploy our AEM SaaS project. In addition, traefik and createcert services are used to provide domain routing and SSL certificates for the stack.
Here is the relevant config for these services; you can see the completed docker-compose file here aemdesign-project-services.
version: "3.9"

services:

  ##########################################################
  # AUTHOR START
  ##########################################################
  # update query limit http://localhost:4502/system/console/jmx/org.apache.jackrabbit.oak%3Aname%3Dsettings%2Ctype%3DQueryEngineSettings
  author:
    image: ${AUTHOR_IMAGE}
    hostname: author
    restart: unless-stopped
    healthcheck:
      test: curl -u admin:admin --header Referer:localhost --silent --connect-timeout 5 --max-time 5 http://localhost:8080/system/console/bundles.json | grep -q \"state\":\"Installed\" && exit 1 || exit 0
      interval: 10s
      timeout: 10s
      retries: 20
      start_period: 1s
    ports:
      - ${AUTHOR_PORT}:8080
      - ${AUTHOR_DEBUG_PORT}:58242
    environment:
      - TZ
      - AEM_RUNMODE=-Dsling.run.modes=author,crx3,crx3tar,dev,dynamicmedia_scene7,nosamplecontent
      - AEM_JVM_OPTS=-server -Xms248m -Xmx4524m -XX:MaxDirectMemorySize=256M -XX:+CMSClassUnloadingEnabled -Djava.awt.headless=true -Dorg.apache.felix.http.host=0.0.0.0 -Xdebug -agentlib:jdwp=transport=dt_socket,server=y,suspend=n,address=*:58242
      - AEM_PROXY_HOST=proxy
    volumes:
      - author-data:/aem/crx-quickstart/repository
    depends_on:
      - traefik
    labels:
      # note that you want this frontened to match the last. otherwise it will match login.${HOST_DOMAIN}"
      traefik.frontend.priority: 1
      traefik.enable: true
      traefik.http.routers.author.rule: "Host(`${AUTHOR_HOST}`)"
      traefik.http.routers.author.entrypoints: web
      traefik.http.routers.author_https.rule: "Host(`${AUTHOR_HOST}`)"
      traefik.http.routers.author_https.tls: true
      traefik.http.routers.author_https.entrypoints: websecure
      traefik.http.services.author.loadbalancer.server.port: 8080
      traefik.http.services.author.loadbalancer.passHostHeader: true
    networks:
      - mongo-network
      - author-network
      - publish-network
      - dispatcher-network
      - internal
      - default
  ##########################################################
  # AUTHOR END
  ##########################################################


  ##########################################################
  # PUBLISH START
  ##########################################################
  publish:
    image: ${PUBLISH_IMAGE}
    hostname: publish
    restart: unless-stopped
    healthcheck:
      test: curl -u admin:admin --header Referer:localhost --silent --connect-timeout 5 --max-time 5 http://localhost:8080/system/console/bundles.json | grep -q \"state\":\"Installed\" && exit 1 || exit 0
      interval: 10s
      timeout: 10s
      retries: 20
      start_period: 30s
    ports:
      - ${PUBLISH_PORT}:8080
      - ${PUBLISH_DEBUG_PORT}:58242
    environment:
      - TZ
      - AEM_RUNMODE=-Dsling.run.modes=publish,crx3,crx3tar,dev,dynamicmedia_scene7,nosamplecontent
      - AEM_JVM_OPTS=-server -Xms248m -Xmx1524m -XX:MaxDirectMemorySize=256M -XX:+CMSClassUnloadingEnabled -Djava.awt.headless=true -Dorg.apache.felix.http.host=0.0.0.0 -Xdebug -agentlib:jdwp=transport=dt_socket,server=y,suspend=n,address=*:58242
      - AEM_PROXY_HOST=proxy
    labels:
      # note that you want this frontend to match the last. otherwise, it will match login.${HOST_DOMAIN}"
      traefik.frontend.priority: 2
      traefik.enable: true
      traefik.http.routers.publish.rule: "Host(`${PUBLISH_HOST}`)"
      traefik.http.routers.publish.entrypoints: web
      traefik.http.routers.publish_https.rule: "Host(`${PUBLISH_HOST}`)"
      traefik.http.routers.publish_https.tls: true
      traefik.http.routers.publish_https.entrypoints: websecure
      traefik.http.services.publish.loadbalancer.server.port: 8080
      traefik.http.services.publish.loadbalancer.passHostHeader: true
    volumes:
      - publish-data:/aem/crx-quickstart/repository
    networks:
      - publish-network
      - internal
      - default
  ##########################################################
  # PUBLISH END
  ##########################################################

  ##########################################################
  # DISPATCHER START
  ##########################################################
  dispatcher:
    image: ${DISPATCHER_IMAGE}
    hostname: dispatcher
    restart: unless-stopped
    ports:
      - ${DISPATCHER_PORT}:80
    environment:
      - TZ
      - AEM_PORT=8080
      - AEM_HOST=publish
      - DISP_LOG_LEVEL=trace1 #debug
      - ENVIRONMENT_TYPE=LOCAL
      - AEM_PROXY_HOST=proxy
    labels:
      # note that you want this frontend to match the last. otherwise, it will match login.${HOST_DOMAIN}"
      traefik.frontend.priority: 1
      traefik.enable: true
      traefik.http.routers.dispatcher.rule: "HostRegexp(`${DISPATCHER_HOST}`, `{subdomain:[a-z]+}.${DISPATCHER_HOST}`)"
      traefik.http.routers.dispatcher.entrypoints: web
      traefik.http.routers.dispatcher_https.rule: "HostRegexp(`${DISPATCHER_HOST}`, `{subdomain:[a-z]+}.${DISPATCHER_HOST}`)"
      traefik.http.routers.dispatcher_https.tls: true
      traefik.http.routers.dispatcher_https.entrypoints: websecure
      traefik.http.services.dispatcher.loadbalancer.passHostHeader: true
    volumes:
      - ./dispatcher/src/:/mnt/dev/src/
      - ./dispatcher/scripts/fix-symlinks.sh:/docker_entrypoint.d/zzz-fix-symlinks.sh
    depends_on:
      - proxy
    networks:
      - publish-network
      - dispatcher-network
      - internal
      - default
  ##########################################################
  # DISPATCHER END
  ##########################################################

  ##########################################################
  # TRAEFIK START
  ##########################################################
  traefik:
    image: ${TRAEFIK_IMAGE}
    restart: always
    hostname: traefik
    environment:
      - TZ
    security_opt:
      - no-new-privileges:true
    command:
      - "--log.level=${TRAEFIK_LOG_LEVEL}"
      - "--accesslog=${TRAEFIK_ACCESS_LOG}"
      - "--api.insecure=true" # Don't do that in production!
      - "--api.dashboard=true" # Don't do that in production!
      - "--providers.docker=true"
      - "--providers.docker.exposedbydefault=false"
      - "--global.sendAnonymousUsage=true"


      # Entrypoints for HTTP, HTTPS, and NX (TCP + UDP)
      - "--entrypoints.web.address=:${TRAEFIK_PORT_HTTP}"
      - "--entrypoints.websecure.address=:${TRAEFIK_PORT_HTTPS}"
      # - "--entrypoints.mongo.address=:${MONGO_PORT}"
      # - "--entrypoints.traefik.address=:${TRAEFIK_PORT_DASHBOARD}"
      # - "--entrypoints.web.http.redirections.entryPoint.to=websecure"
      # - "--entrypoints.web.http.redirections.entryPoint.permanent=true"

      # Manual keys
      - "--providers.file.directory=/etc/traefik/dynamic_conf"
      - "--providers.file.watch=true"

    labels:
      traefik.frontend.priority: 1
      traefik.enable: true
      traefik.http.routers.traefikdashboard.rule: "Host(`${TRAEFIK_HOST}`) && ( PathPrefix(`/api`) || PathPrefix(`/dashboard`) )"
      traefik.http.routers.traefikdashboard.entrypoints: web
      traefik.http.routers.traefikdashboard.service: api@internal
      traefik.http.routers.traefikdashboard_https.rule: "Host(`${TRAEFIK_HOST}`) && ( PathPrefix(`/api`) || PathPrefix(`/dashboard`) )"
      traefik.http.routers.traefikdashboard_https.entrypoints: websecure
      traefik.http.routers.traefikdashboard_https.tls: true
      traefik.http.routers.traefikdashboard_https.service: api@internal
      traefik.http.services.traefikdashboard.loadbalancer.server.port: 8080

    ports:
      - ${TRAEFIK_PORT_HTTP}:80
      - ${TRAEFIK_PORT_HTTPS}:443
      - ${TRAEFIK_PORT_DASHBOARD}:8080
    volumes:
      - /var/run/docker.sock:/var/run/docker.sock:ro
      # Persist certificates, so we can restart as often as needed
      - ./services/traefik/certs:/letsencrypt
      - ./services/traefik/config/config.yml:/etc/traefik/dynamic_conf/conf.yml:ro

    depends_on:
      createcert:
        condition: service_completed_successfully

    networks:
      - author-network
      - publish-network
      - dispatcher-network
      - internal
      - default

  createcert:
    image: ${CERTS_IMAGE}
    environment:
      - TZ
    command:
      - "${CERTS_COMMAND}"
    volumes:
      - ./services/traefik/certs:/certs
  ##########################################################
  # TRAEFIK END
  ##########################################################

networks:
  default:
  internal:
  author-network:
  publish-network:
  dispatcher-network:
  mongo-network:

volumes:
  author-data:
  authormongo-data:
  publish-data:
  dispatcher-data:
And as you can see by now, we have many services with links and configuration options that provide a lot of value. These services and their configuration also mean there is much more to remember and teach new team members. To make this easier, we can add a few more benefits to take your AEM SaaS project to the next level. Your head is already spinning, but don’t worry; it will spin more from excitement once you see the final outcome! 😎
Proxy Service
First, let’s add the missing proxy service that will allow us to further make our Docker setup a Swiss army knife!
Now, this will allow you to set up those pesky reverse proxy rules that we all love! But this also will allow you to test all those OSGI configs $[env:AEM_PROXY_HOST;default=proxy.tunnel] that you have been setting up in your AEM projects. This will allow you to test them locally, as there isn’t any official way to do this otherwise. You will find AEM_PROXY_HOST=proxy added to the environment config for Author and Publish services.
Dashboard Service
Now that we have all these glorious core services, the obvious question is how to document all these links and make them relevant to each service and useful to each person using this. Well, the answer is simple, we add a custom Dashboard generator to do this for us. Let’s add dashboard services to our docker-compose file.
  ##########################################################
  # DASHBOARD START
  ##########################################################
  dashboardbuild:
    image: ${DASHBOARD_BUILD_IMAGE}
    privileged: true
    environment:
      - TZ
      - JEKYLL_ENV=production
      - DOMAIN_URL
      - GIT_REPO
      - GIT_REPO_ADOBE
      - GIT_REPO_ICON
      - GIT_REPO_TITLE
      - GIT_REPO_ADOBE_ICON
      - GIT_REPO_ADOBE_TITLE
      - TRAEFIK_URL
      - TRAEFIK_PORT_HTTP
      - TRAEFIK_PORT_HTTPS
      - TRAEFIK_PORT_DASHBOARD
      - PROXY_URL
      - MONGOUI_URL
      - AUTHOR_URL
      - AUTHOR_PORT
      - AUTHOR_DEBUG_PORT
      - PUBLISH_URL
      - PUBLISH_PORT
      - PUBLISH_DEBUG_PORT
      - DISPATCHER_URL
      - DASHBOARD_URL
      - DISPATCHER_HOST
      - PAGE_LINKS
      - SHOWCASE_LINKS
      - AUTHOR_LINKS
      - CONSOLE_LINKS
    command: bash /srv/jekyll/build.sh
    volumes:
      - ${DASHBOARD_CONTENT_PATH}:/srv/jekyll:rw

  dashboard:
    image: ${DASHBOARD_IMAGE}
    restart: unless-stopped
    working_dir: /content
    hostname: dashboard
    depends_on:
      - traefik
      - dashboardbuild
    labels:
      traefik.frontend.priority: 1
      traefik.enable: true
      traefik.http.routers.dashboard.rule: "Host(`${DASHBOARD_HOST}`)"
      traefik.http.routers.dashboard.entrypoints: web
      traefik.http.routers.dashboard_https.rule: "Host(`${DASHBOARD_HOST}`)"
      traefik.http.routers.dashboard_https.tls: true
      traefik.http.routers.dashboard_https.entrypoints: websecure
      traefik.http.services.dashboard.loadbalancer.server.port: 80
      traefik.http.services.dashboard.loadbalancer.passHostHeader: true
    volumes:
      - ${DASHBOARD_CONTENT_PATH}/_site:/content
      - ${DASHBOARD_CONFIG_FILE}:/etc/nginx/nginx.conf
    environment:
      - TZ
    networks:
      - internal
  ##########################################################
  # DASHBOARD END
  ##########################################################
Dashboard Build Service
The service dashboardbuild is used to build Jekyll content and dashboard service is used to serve the content.
This service will be responsible for generating a dashboard html and assets so that we can serve it from a simple Nginx server. This service will use a Jekyll template to generate the dashboard. This template is located in the ./services/dashboard/content folder. This service uses environment variables to ensure minimal duplication and hardcoding is being added to the dashboard. Environment variables will also allow you to reuse your dashboard config on other projects. If you stick to the default values, you will not need to change anything. But if you do need to change anything, you can do so by updating the .env file at the root of your project.
As you can see, dashboardbuild service heavily uses your environment variables to configure all of the services. This is done to make it easy to configure and use. Let’s look at the environment variables that are used to configure the dashboard.
Environment Configuration
The following configurations should be updated for your project. These configurations are used on the dashboard page to display the project information.
You can get all this information from the Adobe Developer or Adobe Experience consoles.
Project Config
This configuration is used to construct project URLs in the Console Config section.
ADOBE_PROGRAM_ID="99999"
ADOBE_PROGRAM_REGION_ID="99999"
ADOBE_PROGRAM_ENVIRONMENT_PROD_ID="999991"
ADOBE_PROGRAM_ENVIRONMENT_STAGE_ID="999992"
ADOBE_PROGRAM_ENVIRONMENT_DEV_ID="999993"
ADOBE_PROGRAM_NAME="aemdesign"
ADOBE_PROGRAM_LOCATION="AEMDESIGN-p${ADOBE_PROGRAM_ID}-${ADOBE_PROGRAM_REGION_ID}"
ADOBE_PROGRAM_TITLE="AEM.Design"
ADOBE_PROGRAM_DESCRIPTION="AEM.Design"
ADOBE_PROGRAM_URL="https://aem.design"
Console Config
These are the console links for the project; they are displayed on the dashboard page and will enable you to quickly navigate to the console pages for the project.
# Console Config
ADOBE_CONSOLE_EXPERIENCE_URL="https://experience.adobe.com/#/@${ADOBE_PROGRAM_NAME}/cloud-manager/environments.html/program/${ADOBE_PROGRAM_ID}"
ADOBE_CONSOLE_EXPERIENCE_URL_ICON="fab fa-adobe"
ADOBE_CONSOLE_EXPERIENCE_URL_TITLE="Cloud Manager"

ADOBE_CONSOLE_DEVELOPER_URL="https://developer.adobe.com/console/home"
ADOBE_CONSOLE_DEVELOPER_URL_ICON="fab fa-adobe"
ADOBE_CONSOLE_DEVELOPER_URL_TITLE="Developer Console"

ADOBE_CONSOLE_ADMIN_URL="https://adminconsole.adobe.com/"
ADOBE_CONSOLE_ADMIN_URL_ICON="fab fa-adobe"
ADOBE_CONSOLE_ADMIN_URL_TITLE="Admin Console"

# format: <URL>|<TITLE>|<ICON>
CONSOLE_LINKS="${ADOBE_CONSOLE_EXPERIENCE_URL}|${ADOBE_CONSOLE_EXPERIENCE_URL_TITLE}|${ADOBE_CONSOLE_EXPERIENCE_URL_ICON},${ADOBE_CONSOLE_DEVELOPER_URL}|${ADOBE_CONSOLE_DEVELOPER_URL_TITLE}|${ADOBE_CONSOLE_DEVELOPER_URL_ICON},${ADOBE_CONSOLE_ADMIN_URL}|${ADOBE_CONSOLE_ADMIN_URL_TITLE}|${ADOBE_CONSOLE_ADMIN_URL_ICON}"
Page and Showcase Links
When developing or testing the project, you typically want to navigate to the home page or showcase page. This allows you to configure any commonly used quick links. Update PAGE_LINKS with a link you want to use on a regular basis.
Typically you would want to add links to each homepage for every site you will be working on. Furthermore, you should have a sister showcase site for each of your live sites; updating SHOWCASE_LINKS will add an additional row of links matching your PAGE_LINKS links.
These links are displayed on the dashboard page.
# format: <URL>|<TITLE>|<ICON>|<DISPATCHER SUBDOMAIN>
PAGE_LINKS="/content/aemdesign/home.html|AEM.Design - Home|fa fa-globe|aemdesign"
SHOWCASE_LINKS="/content/aemdesign-showcase.html/|AEM.Design - Showcase|fa-globe|aemdesign"
Environment Link
These are the environment links for the project, and they are displayed on the dashboard page, which will enable you to quickly navigate to the environment pages for the project. By default, this is configured to basic PROD, STAGE, and DEV environments. Update this to match all of your provisioned environments.
ADOBE_PROGRAM_ENVIRONMENT_PROD_URL="https://author-p${ADOBE_PROGRAM_ID}-e${ADOBE_PROGRAM_ENVIRONMENT_PROD_ID}.adobeaemcloud.com/"
ADOBE_PROGRAM_ENVIRONMENT_PROD_TITLE="Prod"
ADOBE_PROGRAM_ENVIRONMENT_PROD_ICON="fa fa-globe"

ADOBE_PROGRAM_ENVIRONMENT_STAGE_URL="https://author-p${ADOBE_PROGRAM_ID}-e${ADOBE_PROGRAM_ENVIRONMENT_STAGE_ID}.adobeaemcloud.com/"
ADOBE_PROGRAM_ENVIRONMENT_STAGE_TITLE="Stage"
ADOBE_PROGRAM_ENVIRONMENT_STAGE_ICON="fa fa-globe"

ADOBE_PROGRAM_ENVIRONMENT_DEV_URL="https://author-p${ADOBE_PROGRAM_ID}-e${ADOBE_PROGRAM_ENVIRONMENT_DEV_ID}.adobeaemcloud.com/"
ADOBE_PROGRAM_ENVIRONMENT_DEV_TITLE="Dev"
ADOBE_PROGRAM_ENVIRONMENT_DEV_ICON="fa fa-globe"

# format: <URL>|<TITLE>|<ICON>
AUTHOR_LINKS="${ADOBE_PROGRAM_ENVIRONMENT_PROD_URL}|${ADOBE_PROGRAM_ENVIRONMENT_PROD_TITLE}|${ADOBE_PROGRAM_ENVIRONMENT_PROD_ICON},${ADOBE_PROGRAM_ENVIRONMENT_STAGE_URL}|${ADOBE_PROGRAM_ENVIRONMENT_STAGE_TITLE}|${ADOBE_PROGRAM_ENVIRONMENT_STAGE_ICON},${ADOBE_PROGRAM_ENVIRONMENT_DEV_URL}|${ADOBE_PROGRAM_ENVIRONMENT_DEV_TITLE}|${ADOBE_PROGRAM_ENVIRONMENT_DEV_ICON}"
Git Config
This configuration is used for Git links.
# Git Config
#GIT_REPO_AUTH="<username>:<password>@"  # set this in your terminal
GIT_REPO_AUTH=""
GIT_REPO="https://${GIT_REPO_AUTH}github.com/aem-design/aemdesign-project-services.git"
GIT_REPO_ICON="fa-github" #fa-github,fa-bitbucket
GIT_REPO_TITLE="Github"
#GIT_REPO_ADOBE_AUTH="<username>:<password>@" # set this in your terminal
GIT_REPO_ADOBE_AUTH=""
GIT_REPO_ADOBE="https://${GIT_REPO_ADOBE_AUTH}git.cloudmanager.adobe.com/${ADOBE_PROGRAM_NAME}/${ADOBE_PROGRAM_LOCATION}/ "
GIT_REPO_ADOBE_ICON="fa-adobe"
GIT_REPO_ADOBE_TITLE="Adobe Git"
Dashboard Service Example
Now that we can generate our dashboard page, we can serve it using a simple Nginx server. This service will use a ./services/dashboard/config/nginx.conf file to configure the Nginx server and load the contents from ./services/dashboard/content/_site folder. This service will be available at https://dashboard.localhost if you do not change the default values.
To give you an idea of what this will look like, here is a screenshot of the dashboard page.
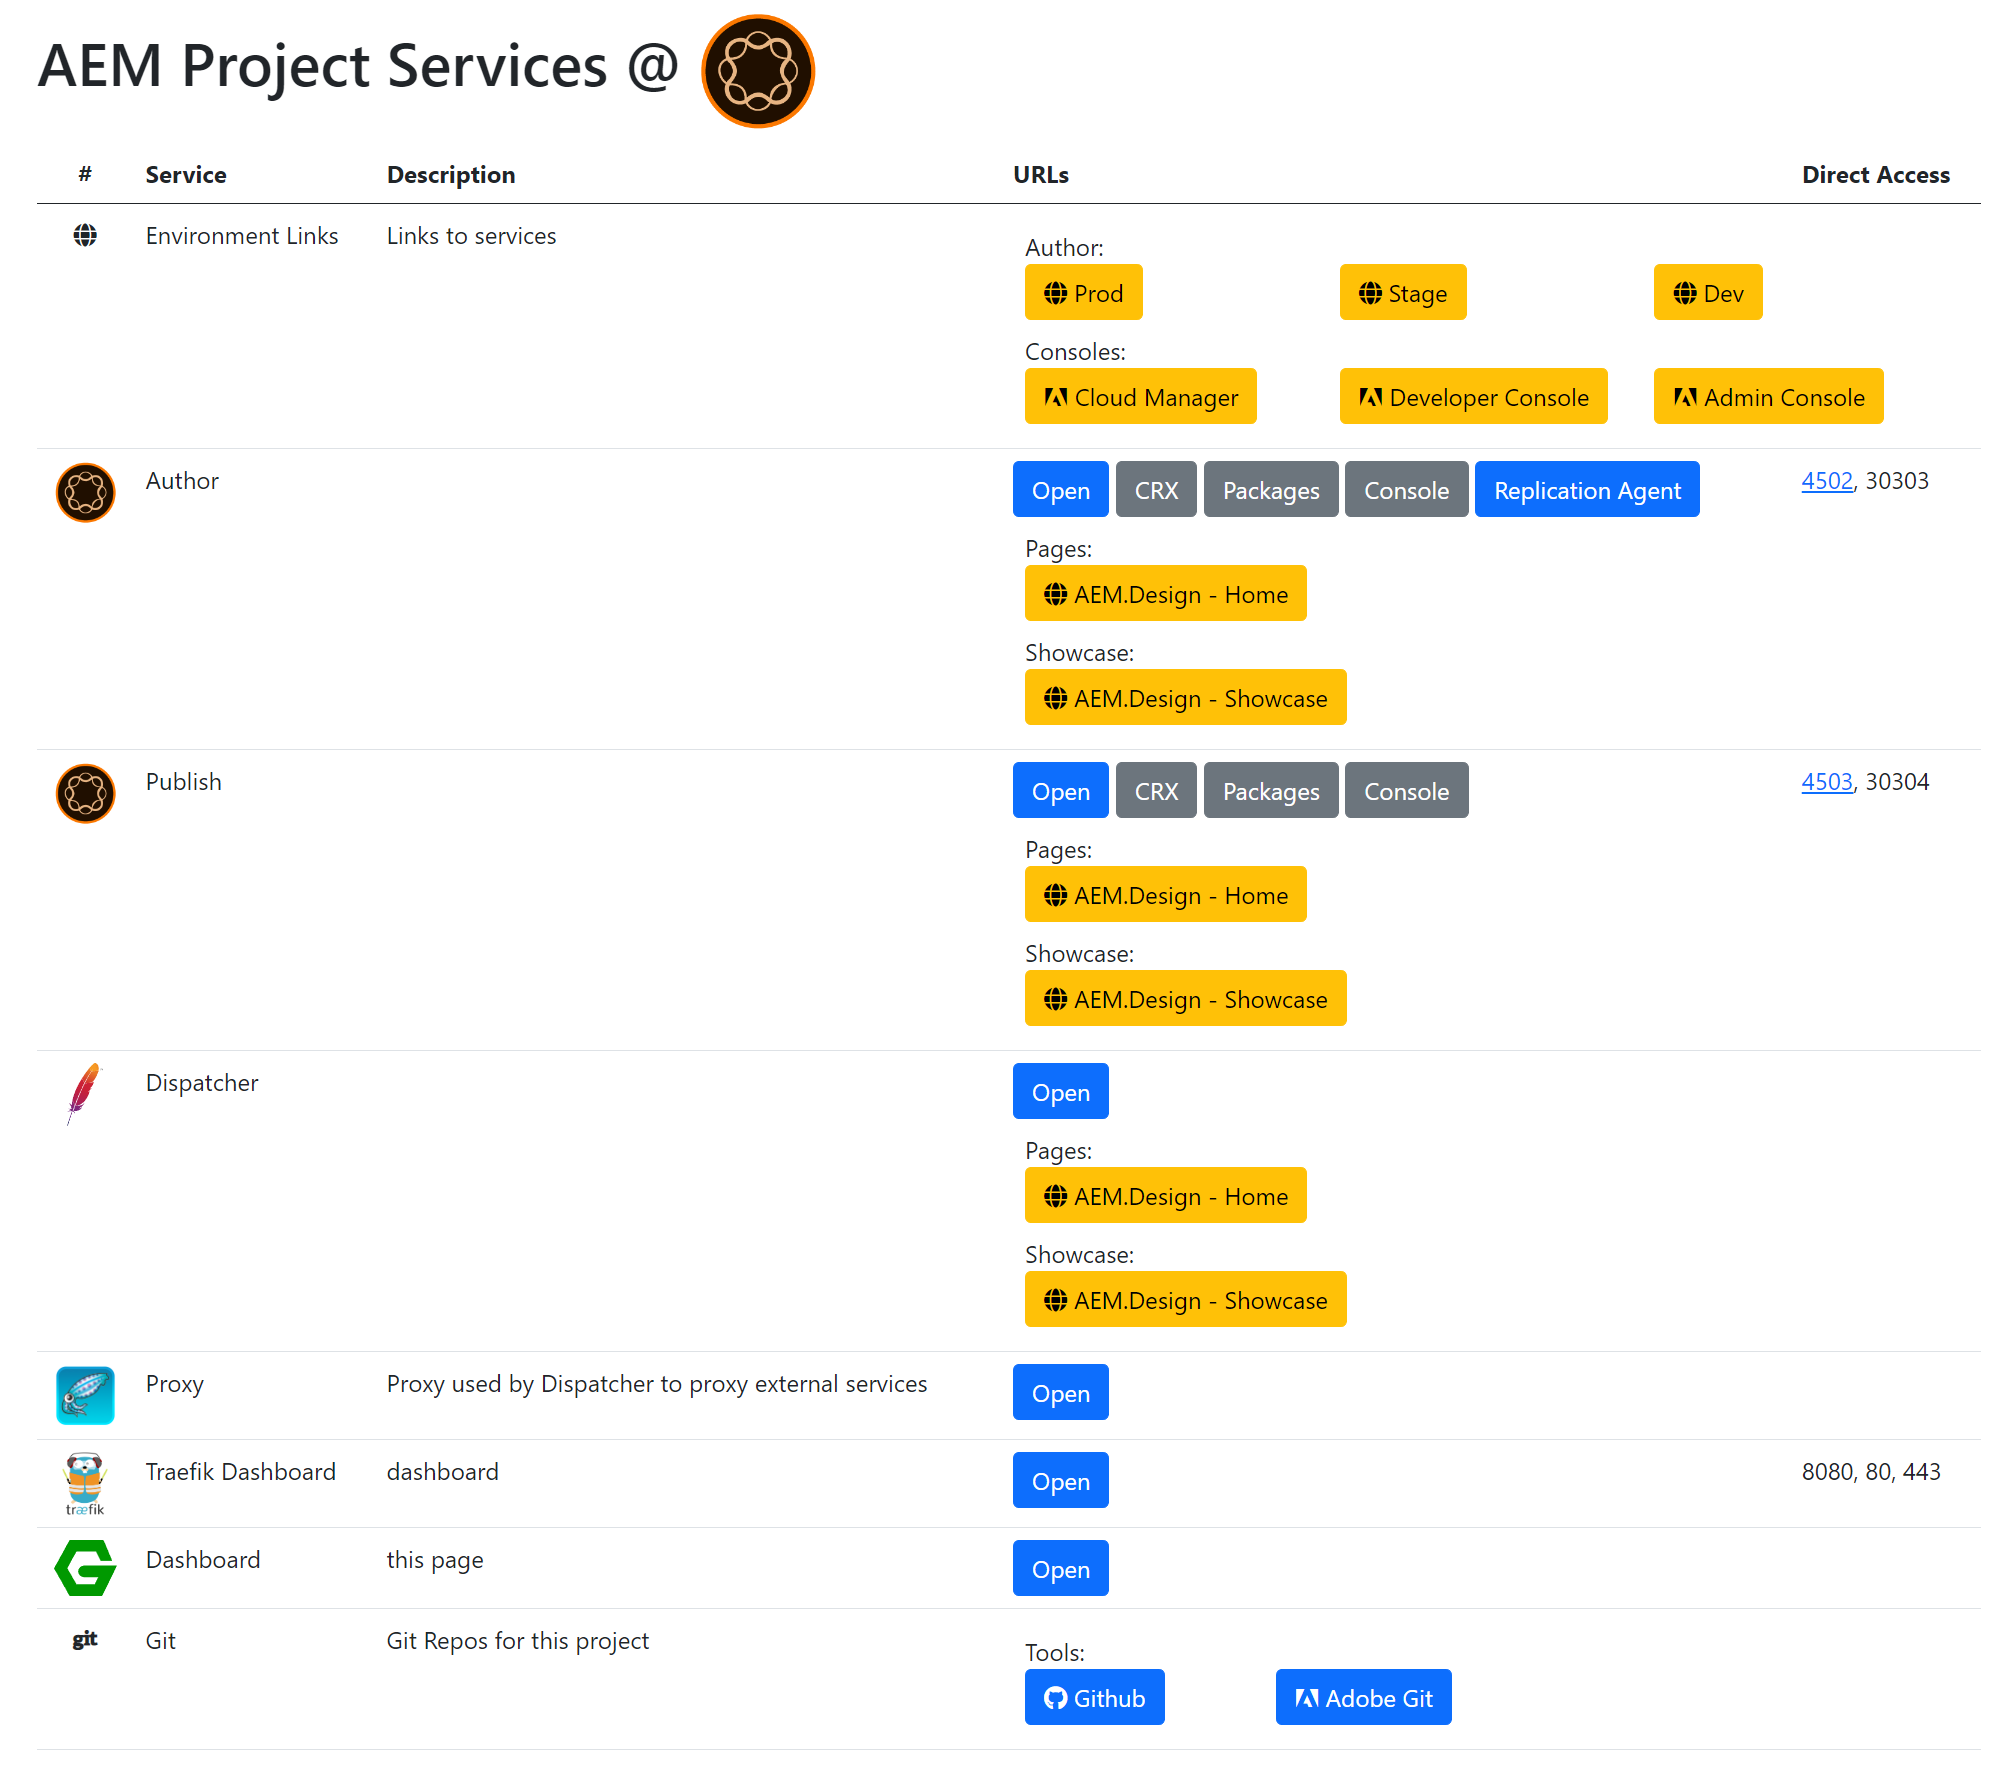
As you can see, this is a simple page that will allow you to navigate to all the services that we have set up. This will also allow you to add additional links as needed and have a single place to manage and share them with your team or remind yourself in not so distant future. To update this dashboard page, you will need to update the ./services/dashboard/content/index.md file. This file is a markdown file, it’s used by Jekyll to generate the resulting HTML page that will be served by Nginx on https://dashboad.localhost.
Another Example
This guide is not focused on how to use the Jekyll site generator works, as you should be able to tap into its documentation site for further help. This site is also built using Jekyll, so you can check what is possible using Jekyll in its repo https://github.com/aem-design/aem.design.
You will also find that this dashboard pattern is implemented in this repo. Here is a screenshot of the dashboard page for this repo.
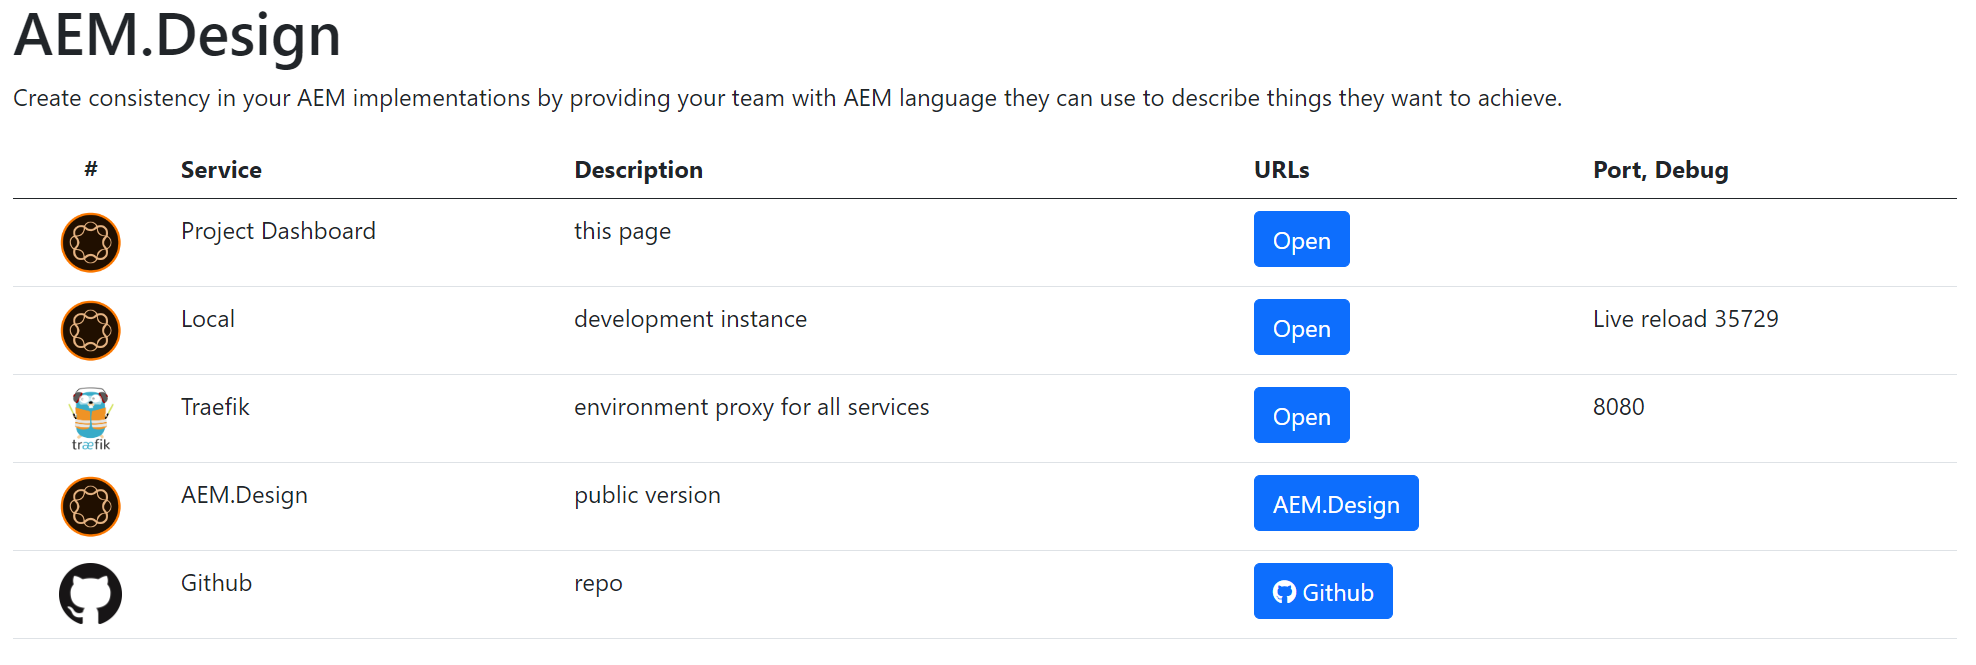
So you can copy and apply this pattern to your other projects as well.
Conclusion
I hope you will find this guide useful and will be able to apply it to your projects. This method persists all knowledge within the project repo with an elegant presentation of an alternative reality of a wild west of bookmarks and hidden confluence pages.
If you want to test out this setup for yourself, you can clone aemdesign-project-services repository and run the ./start.ps1 command to see it in action. This will start all the services and open the dashboard page at https://dashboard.localhost.
Thank you
I hope you enjoyed this guide. If you have any questions or comments, feel free to contact me. I will be happy to help.
Let me know what you think and don’t forget to tell your friends.
Leave a Comment